Pages

Tuesday, December 21, 2010

Creamy Rosemary Potato Gratin

My mom and The New Basics Cookbook are to blame for my addiction to this incredible, easy potato side dish. Mom used to make it in a huge roasting pan for Thanksgiving or Christmas dinner and just about any other time it made sense. Then I made it as a vegetarian main dish for the lunch special at The Still Life (served with a simple salad and sometimes half potatoes and half sweet potatoes). The hardest part is cutting potatoes thinly, but the whole thing can be made the day before, cooked halfway, then finished on the day of. If I'm making it ahead, I leave off the parm and bread crumbs, cover it with foil, and cook it for about half an hour. Then just pick up at the sprinkle stage in the directions and cook for about 45 minutes more (uncovered).
It comes with a warning - do not try this if you don't want to crave it on almost every chilly, wintry day.


Creamy Rosemary Potato Gratin
serves 6

3 pounds Russet potatoes
1 1/2 cups heavy cream
1/4 cup finely chopped shallots (sub onion if you can't find shallots)
4 cloves garlic, minced
2 bay leaves
1 1/2 T finely chopped fresh rosemary
1 8oz block of cream cheese
1/2 cup whole milk
1/2 t paprika
salt & pepper to taste
3/4 cup grated Parmesan
1/4 cup fine bread crumbs
  • Preheat the oven to 325. Oil the bottom of a 9x13 pan.
  • Peel and very thinly slice the potatoes. To keep them from turning brown as you work, put the slices in a bowl and toss with 3/4 cup of cream.
  • Melt the butter in a large frying pan then add the shallots and garlic. Saute until soft and just starting to get a brown edge or two.
  • Add the bay leaves, rosemary, remaining cream, cream cheese (break it into little chunks), paprika, salt and pepper. Whisk it until the cream cheese melts and the sauce is smooth.
  • Toss the sauce gently with the potatoes.*
  • Dump everything in the 9x13 pan and smooth out any potatoes that are sticking up. You don't need to do a fancy scalloped potato layering job, but you also don't want major air pockets. 
  • Sprinkle with the Parmesan and then the bread crumbs.
  • Bake until the potatoes are tender and the top is golden and bubbly - a little over an hour.
*To make this on a busy work day, I made the sauce the day before (including the 3/4 cup cream that gets tossed on the pots). Then I warmed up the sauce and slid the sliced potatoes into the pan as I cut them. Worked great and split the prep into two little pockets of time that I had.

Tuesday, December 7, 2010

Roasted Squash and Leek Gratin

I don't usually choose the vegetarian option for my main dish, but when my mother-in-law served this at a family dinner a while ago I fell in love. Yes, I like just about anything with leeks, but I generally don't like butternut squash (it all goes back to this butternut mole soup I had to make every Friday for months...). This dish is really about the combination of flavors - the sweet-but-not-too-sweet roasty squash, the savory perfectness of the cooked leeks, the tang of the goat cheese, and then the toasted nuts and barley to round it out.
When I make this I think of Rachel Ray because you get the first three steps going all at once (and that's what she's all about - how many pots can you get going at once). So you rush around for 20 to 30 minutes getting everything set up, but then you pop it in the oven for the last 30 minutes and you're relaxed by the time it's ready.

Roasted Squash and Leek Gratin
serves 4 for dinner, 6 to 8 as a side

1 cup pearl barley (measured before cooking)
2 to 3 cups stock
1 large butternut squash, peeled and cut bite-sized
2 large leeks
2 T butter
5 oz. goat cheese
1 cup cream
3/4 cup hazelnuts, toasted and chopped

  • Get the barley going (it cooks pretty much like rice): Rinse the barley, bring the stock to a boil, add the barley to the stock, cover, reduce the heat so it simmers for about 30 minutes. You can also leave the barley out if you want.
  • Get the squash in the oven: Toss the peeled cubes with salt and pepper and olive oil, spread them out over two cookie sheets, roast in a 400 degree oven for about 20 minutes. They should be mostly cooked and just starting to brown on the edges.
  • Get the leeks on: Remove the tough green parts and the roots, slice longways and then into thin half-moons, rinse well, saute in the butter until super soft - about 15 to 20 minutes.
  • Spread the barley in the bottom of a buttered 9x13 pan.
  • Toss the leeks and squash together gently (the squash might want to fall apart here) and layer over the barley.
  • Dot the top of the casserole with pieces of the goat cheese, then drizzle the cream over everything and sprinkle the hazelnuts on top.
  • Bake for 30 minutes in a 375 degree oven. Let it cool for a few minutes before serving.

Saturday, November 13, 2010

Bratwurst with Cabbage and Granny Smith Apple

I'm a little obsessed with sausage right now. We sell our Sugar & Salt products out of the case at The Swinery and they make fantastic sausages (at first I thought the price was too high for our budget, but now that I've tried them it's hard to go back to the cheaper ones). They make the best bratwurst I've ever had. And they make Bacon Brats. Since the grill is covered for the season, I've been trying to come up with an excuse, I mean a recipe, to use these brats. There's one more complication - I don't love sauerkraut. I don't hate it, but if I bought some and didn't use the whole container it would sit in my fridge until it went bad. Maybe it can't go bad, but still, my fridge is full of pickles, I can't have sauerkraut taking up space. So here's a recipe that uses brats, fresh cabbage, and an apple to make it more interesting. We had it with buttered egg noodles on the side, but it would be great with boiled potatoes too. And some good mustard, if you like that sort of thing.

Brats with Cabbage and Apple
serves 4

1 pound (usually 4) bratwurst, substitute pretty much any other German sausage
1 onion, sliced thin
1/2 a cabbage (about 4 cups), use green or purple or savoy or your favorite
2 T butter
2 t caraway seeds (optional)
1/4 cup apple cider vinegar
1 t mustard
1 Granny Smith Apple, grated
  • In a large, high-sided frying pan brown the brats on both sides over medium heat. You may need to add a little oil depending on the fat content of the sausages. Set aside - no need to cook them through because they're going back in later.
  • Melt the butter in the same pan and add the onion. Saute until it's very soft.
  • Shred the cabbage as thin as you can and add it to the pan with the caraway. Saute for about 10 minutes - until the cabbage has softened.
  • Turn the heat to medium-low and add the brats back to the pan with the vinegar, mustard and salt & pepper to taste. Cover and cook for 15 minutes. Check in once during that time and add a splash of water if the pan seems dry.
  • Add the apple and cook for 5 more minutes. If you like the liquid level in the pan, put the lid back on. If it seems too wet, leave the lid off.
  • Serve with egg noodles or potatoes, dollops of sour cream and mustard, and maybe a sprinkle of parsley.

Wednesday, November 10, 2010

Warm Spinach and Brussel Sprout Salad

This didn't start out as a blog post dinner, it started off as a way to use up a huge stalk of brussel sprouts I impulse-bought when I was at a pumpkin farm. My favorite way to eat brussel sprouts is shredded up in this salad, but here's the part I hadn't thought of: I have an on-again-off-again relationship with vegetables anyway, I certainly wasn't going to be in the mood for a cold salad when it's been so dreary here lately. So the brussel sprouts were just sitting there taking up half my fridge. Then I thought to adjust that great salad recipe into something better suited for a seriously rainy day and now I'm hooked on warm salad. If you want to leave out the bacon and/or bacon fat, just substitute warmed olive oil. If you make extra dressing it will keep for at least a week, just reheat in the microwave before using.


Warm Spinach and Brussel Sprout Salad
serves 2 as a dinner

Dressing:
2 - 3 cloves garlic
4 slices of bacon
1 t mustard
3 T red wine vinegar
olive oil (maybe)
S & P to taste

Salad:
1/2 a bunch of spinach (about  6 cups), roughly chopped
12 - 15 brussel sprouts
  • Shred the brussel sprouts just like they are mini heads of cabbage (cut off the ends, cut them in half from top to bottom, then cut in super thin strips).
  • Cut the bacon into bite-sized pieces and cook in a pan until crispy. 
  • Remove the bacon, but leave the fat in the pan. You need 3 tablespoons of fat and it depends on the bacon you use if you'll have that. If it seems like you don't have enough, add some olive oil. If it seems like you have too much, take some out of the pan (but save it in case you want to adjust the flavor later).
  • Add the other dressing ingredients (not too much salt because most bacon is salty) to the pan on very low. Whisk well for a minute or two to heat the dressing and combine all the flavors.
  • Toss the spinach, brussels, bacon, and dressing together and you're done (unless you want to add toasted walnuts, which I'm going to try next time).

Monday, November 1, 2010

Middle Eastern Meatball Soup

This soup inspired me to add (finally!) something new to the Basics page because it was yet another easy and delicious dinner and it also uses every one of my "Soup Tricks." It's a little on the complicated side because you have to make the meatballs and do some pureeing, so I'll call it a weekend or entertaining soup - great for a day when you have a little more time, but of course you still don't want to slave at the stove. I love the combination of lamb and mint and lemon and tomatoes. Right after I took this photo, I dropped in a dollop of plain yogurt and, oh my goodness, that tangy, creamy addition pushed it up to the level of New Favorite. Serve with warm pita or flatbread, a little hummus as an appetizer maybe, and you have a whole evening set.

Middle Eastern Meatball Soup
Serves 4 to 6

For the meatballs:
1 pound ground lamb (it's a little pricey, but the rest of the soup is pretty inexpensive)
1/4 cup fine bread crumbs or Panko
2 cloves garlic, minced
2 t cumin
pinch of red pepper flakes
1 T parsley, minced
1 t fresh mint, minced
1/2 t oregano (I used dried, but fresh would have been great)
1 t salt
1/2 t pepper
  • Put all meatball ingredients together in a bowl and mix gently. Try not to mix anymore than is needed.
  • Roll the mixture into small, bite-sized balls and set aside.
 For the soup:
4 T butter
1 onion, chopped
4 cloves garlic, chopped
2 T paprika, hot and smoked if you can find it
2 T cumin
pinch of red pepper flakes
pinch of cinnamon
1 28oz can whole tomatoes
2 15oz cans of garbanzo beans/chick peas
4 to 5 cups stock
juice of 1 lemon
1 t fresh mint, minced
1/2 cup parsley, chopped
3 cups spinach, chopped
  • Saute the onion in the butter in the bottom of a soup pot. When it starts to brown, add the garlic and saute until it just starts to brown.
  • Add the paprika, cumin, cinnamon, and red pepper flakes and saute for about a minute to get them a little toasty.
  • Have the tomatoes open in case the spices start to stick too much - you can quickly dump them in and prevent anything from burning.
  • Simmer for about 20 minutes to cook off the extra liquid in the tomatoes. Stir occasionally, breaking up the whole tomatoes.
  • Puree this in a blender or food processor or with a hand blender. You can make it as smooth or chunky as you want. I like it pretty smooth.
  • Put the puree back in the soup pot and bring it back to a simmer. Drop in the meatballs (do your best to not have them piled on top of each other) and simmer for about 5 minutes.
  • Add the stock and garbanzo beans and simmer for about 30 minutes to finish cooking the meatballs and get all the flavors happy together.
  • About 5 minutes before serving, add the lemon, mint, parsley, and spinach. Once the spinach is wilted, you're ready to go.

Sunday, October 31, 2010

Didi's Potatoes

This is one of those great recipes that reminds me that simple is often best. When I first tried these, at a family reunion a few years ago, I figured there was a complicated spice mixture involved or some secret step. I even got the recipe from my aunt, but never made them (it was too easy, it seemed like she must have left something out). Then family reunion time rolled around again and I stood at my aunt's shoulder and watched her make them. It's really as easy as it sounds. We had them for dinner recently alongside a very simple grilled chicken breast and green beans, but I had to use the photo from the family reunion - luckily I cut in line to snap a shot before the potatoes were all gone.

Didi's Potatoes
serves 4 (as a side)

2 pounds medium-sized red potatoes, skins on
4 T butter or olive oil
4 cloves garlic, chopped
1/2 t turmeric
2 t cumin
cayenne to taste
generous salt to taste
  • Boil the potatoes whole in plenty of water (time varies depending on the size) until a knife slides in the potato easily.
  • Cut them in half and then slice into half circles. You can peel them if you want, but my aunt doesn't do that, so I don't either.
  • In the bottom of the pot used for the potatoes, saute the garlic in the butter until it is just starting to brown.
  • Sprinkle on the spices and toast for a minute.
  • Remove from the heat and toss in the potatoes and salt, stir well, and you're done.

Tuesday, October 26, 2010

Portuguese Kale and Linguica Soup

Here's another favorite soup from my cooking-at-the-Still-Life days. With the sausage, potatoes, kale, and tomatoes it works great as a dinner. I'm not good at serving sides with soup (unless a grilled cheese sandwich or buttered toast count, but I think they don't) so I love it when my green veggies for the meal are already in there. Linguica is a spicy, smoky Portuguese sausage that gives this soup so much flavor. If you can't find linguica, substitute kielbasa or even spicy Italian sausage. As I'm writing this the wind is knocking over garbage cans and the rain is sneaking its way down my chimney into my basement - a perfect night for something warming and stress-free.

Portuguese Kale and Linguica Soup
serves 6 to 8, we freeze the leftovers

1 onion, chopped
4 cloves garlic, chopped
1 T tomato paste
1 cup red wine
2 14 oz cans diced tomatoes
1 pound Linguica (or other sausage*), cut into thin coins
1 bunch kale (after washing and chopping it's about 4 cups)
6 medium red potatoes, cut bite-sized
8 to 10 cups stock
1 t paprika (hot and smoked if you can find it)
1 T thyme
1 T mustard powder (substitute dijon mustard if you have to)
2 bay leaves
pinch of red pepper flakes
pinch of cinnamon

  • This starts the way almost everything I make starts - saute the onion in a couple tablespoons of olive oil until it just starts to brown, then add the garlic and saute until it just starts to brown.
  • Add the paprika and tomato paste and cook them until they're stuck to the bottom of the pan and just starting to brown. Then dump in the wine so nothing burns.
  • Reduce the wine for about 5 minutes, just to cook off the alcohol. Then add everything except the kale (hold back a little on the stock so you can decide how thick you want it). 
  • Simmer for at least 45 minutes. You can eat it as soon as the potatoes are done, but I like to give the sausage more time to flavor everything. 
  • About 10 minutes before serving, add the kale.
*Linguica and kielbasa are already cooked. If you're substituting a fresh sausage like hot Italian, cook it before cutting into coins.

Wednesday, October 20, 2010

Barley, Wild Rice, and Currant Pilaf


Lately I've been working on a new sort-of-blog called Remember These Recipes. It's a place to post images of old family recipe cards that I've found. Because it's not just the dishes themselves that I love, it's the handwriting of my relatives (many who aren't here anymore), the drips on the sides, the little notes people scribbled on the back. Looking through these images I have, of course, been craving some family dinners. This pilaf recipe is one that my grandma made at many many Christmas dinners. I don't have an old card with her handwriting for this. Instead I had to interpret my own bad handwriting and terrible shortcutted directions that I jotted down at her kitchen counter. We ate it with garlic pork chops to try to get close to the garlic pork loin she usually served with it (there's a recipe I'd love to have). I took a bite and immediately remembered sitting on her long couch in the condo with a plate balanced on my lap, a puzzle in progress on the coffee table, Grandpa watching the game from the LayZboy, and family all around. Also, it's delicious.

Barley, Wild Rice, and Currant Pilaf
serves 2 as a generous side

2 T butter
1/2 an onion, diced
2 cloves of garlic, minced
1/ 2 cup wild rice
1/2 cup barley
1/2 cup diced celery and carrots
1/3 cup currants (or raisins in a pinch)
1 bay leaf
1 t dried sage, or 2 fresh leaves, minced
1 t thyme
2 cups stock (chicken or vegetable)
salt and pepper to taste
  • In a small saucepan, saute the onion in the butter until it is starting to turn translucent. Add the garlic and saute about 2 minutes more. If you ever feel like the butter is starting to get too brown, dash in a little olive oil.
  • Add the wild rice and saute until the onions and garlic are light brown - about five minutes more.
  • Add the barley, currants, herbs, pepper to taste, and stock. 
  • Bring it to a low simmer with the lid. Stir occasionally to check if it's sticking. If it seems to be drying out too quickly, add about 1/2 cup more water.
  • Check the tenderness of the barley and rice, and the liquid level after 45 minutes. If there is too much liquid near the end, simmer for the last 10 minutes more with the lid off, stirring a little more frequently.

Wednesday, October 13, 2010

The Dinner Sandwich with Kale, Gouda, and Roasted Sweet Potato

Whenever John is away on a night that I work late I end up eating a white sandwich (toasted sourdough bread, mayonnaise, sharp cheddar cheese, that's it) for dinner. Not only do I love a cheese sandwich, but I also don't really cook for myself. Cook is something I do for other people. But he's going to be away more on these late evenings, so I came up with the Dinner Sandwich. It's a variation on something I made when I cooked for The Essential Baking Company. If you don't have a panini press (because, really, why do I have a panini press), just make this in a frying pan with butter on the outside of the bread - like an old-fashioned grilled cheese.

The Dinner Sandwich
serves 4, but I used the leftovers for other meals

1 red garnet yam (which is really a sweet potato)
1 bunch of kale (or spinach or chard)
1 head of garlic
4 slices Gouda
2 slices of good, hearty bread
olive oil, salt, and pepper
sliced turkey - very optional
  • Peel the sweet potato and slice into thin coins. This will make more than you need, but it's great as a snack, on another sandwich tomorrow, or cut up and sprinkled on a salad.
  • Toss the sweet potato slices in olive oil and salt and pepper and lay them out on a cookie sheet. Bake for about 15 minutes at 400 degrees.
  • Cut the top off of the garlic head and set on top of a square of foil. Drizzle with olive oil and close up the foil so the garlic is sealed in a little bag. Put this in the oven under the sweet potatoes and bake for 30 to 45 minutes. The cloves will be browned and soft. You can just squeeze them out of the papery skin and use as a spread.
  • Drizzle a tablespoon or two of olive oil into a frying pan on medium high heat. Rinse the kale and shake off the water (but don't worry about getting it dry). Tear pieces of the leaves off the woody stem and drop them right into the pan.
  • Stir the torn kale getting it all coated in the oil for about 5 minutes. Put the lid on and let it wilt for about five minutes more (you can skip this if you're using spinach or chard). You're going for cooked, but not mush.
  • You can either refrigerate everything now and use it cold later, or go right on to assembling the sandwich.
  • The main trick to great paninis (or grilled cheese) is to be sure that the cheese is the thing touching both sides of the bread. So for this sandwich I built it in this order: bread, cheese, roasted garlic squished around, sweet potato slices, kale, turkey, a little more garlic, cheese, bread again. 
  • Get it all toasty and melty and you're done. You don't even need a side dish!

Monday, October 4, 2010

Gnocchi in Browned Butter Sage Sauce


I have a sage plant that just won't quit. I bought it looking like nothing more than a sprig stuck in some dirt at least 5 years ago. I've transplanted it and mostly ignored it except to chop it down to the ground once a year, but it still comes back. It begs me to make this dish all summer as it's looking lush and full, but this is a comfort food that has to wait for fall. I've tried drying the leaves for use all year-round, but they're too tender (or I'm doing it wrong). I use dried sage from the grocery store when I need this dinner when the plant is dormant and it's still very good, but not quite as great. I first had it when the Still Life in Fremont was in it's transformation stage (not the old, funky Still Life anymore, but not The 35th Street Bistro yet either). They served it with roasted chicken. We usually just pound and pan sear chicken breasts and then slide them into the simmering sauce when the gnocchi goes in the water.

Gnocchi in Browned Butter Sage Sauce
Serves 2

4 T butter
4 cloves garlic, sliced
pinch of red pepper flakes
3 to 6 fresh sage leaves (depending on how sage-y you like it)
1 cup white wine
16 ounce package of gnocchi
  • Put your pot of water on to boil. This comes together quickly.
  • Have your garlic sliced and ready. In a frying pan big enough to hold the gnocchi and sauce at the end, melt the butter over medium low heat. Let it foam and bubble away until it is light brown - usually about 5 minutes. If you're worried it's gotten too dark (and might burn in the next step), dash in a little olive oil. This will stop the butter from browning further.
  • Add the garlic, thinly shredded sage leaves, and red pepper flakes. Saute until the garlic is light brown and the butter is slightly darker.
  • Add the wine and let simmer until reduced by not quite half, about 5 minutes more. Sometimes I don't feel like buying a bottle of white wine just for this dish, so I substitute diluted chicken stock and the juice of a lemon to equal 1 cup.
  • If your gnocchi isn't done cooking, turn off the heat and wait for it.
  • Add the cooked gnocchi to the pan and stir it for about a minute. The gnocchi itself will thicken the sauce.

Saturday, September 18, 2010

Creamy Zucchini & Basil Pasta

This was my favorite recipe invention of this past summer (past already!), but I never got a great picture of it so I kept holding off posting. Part of the problem - squished up roasted zucchini is delicious, but not very photogenic. The "creamy" in the title comes from the texture of the zucchini, not from the optional cream. I served it as a dip at a dinner I made for my family and when the bowl was almost empty someone took a piece of bread and carefully cleaned out the last remnants - that's the sign of a good dip. It has the bright, summery flavor of fresh basil and the more autumnal, savory flavor of toasty, roasty zucchini. That makes it a great dinner for this in-between-seasons time.

Creamy Zucchini & Basil Pasta
serves 2, generously

4 cups zucchini, cut into bite-sized pieces
3 garlic cloves, minced
1/4 cup finely chopped fresh basil
1/4 cup heavy cream (optional)
1/2 cup grated Parmesan
salt, pepper, and olive oil
3/4 pound short pasta
1/2 cup fresh bread crumbs*
2 T butter

  • Toss the zucchini in olive oil, salt, and pepper and spread onto 2 cookie sheets. Roast in a 450 degree oven for about 20 to 25 minutes. Put the pans a few shelves apart in the oven and switch half-way through so that both pans get nicely browned.
  • Meanwhile, saute the garlic in a small pan until just starting to brown. Set that aside in a bowl big enough to hold the pasta.
  • In the same pan, toast the bread crumbs in the butter until brown.
  • When the zucchini are dark brown, scrape them into the bowl with the garlic. Add the basil, cream, and Parmesan and mix really well, squishing the zucchini against the side of the bowl. 
  • Mix in the hot pasta. Sprinkle the bread crumbs on top of each serving to keep them crunchy.
  • To make this as a dip, omit the bread crumbs and pasta and just serve it with slices of bread or crackers.
*I used 2 pieces of good, white, sourdough bread that I toasted a little, cut into small pieces, and ground up in my Cuisinart.

Wednesday, September 15, 2010

Mom's Almond & Fruit Crumble

Is it a crisp or a crumble? I can't decide. I do know that the first Fourth of July that Mom made this it was a crazy hit - plums, blackberries, and the marzipan flavor from the almond paste along with the melting creaminess of the ice cream. We all asked for it again and again after that. She got the idea from Bon Appetit magazine and when I went looking for the recipe I was surprised to discover that it was actually supposed to be a tart, but Mom just stole the idea for the topping. If you like almonds and crisps/crumbles/whatevers, you'll love this. I make it in the winter with plums I've frozen from the fall. Now is the perfect time to discover you love it too and put away some stone fruits and berries for when a taste of summer will save you from the winter doldrums.

Mom's Almond & Fruit Crumble
serves 12

Topping:
3/4 cup flour
1/2 cup cold almond paste (about 5 oz.)
1/2 cup brown sugar
6 T cold butter
1/4 cup almonds

2 1/4 pounds fruit,* cut into bite-sized pieces
1/2 cup sugar
3 T cornstarch
  • Preheat the oven to 375 degrees.
  • Combine the topping ingredients, except the almonds, in a food processor and pulse until combined. Or cut everything together using a pastry blender. Then mix in the almonds.
  • Toss the fruit with the sugar and cornstarch and spread into a 9x13 pan. Sprinkle the topping over the fruit
  • Bake for 35 to 40 minutes. The fruit should be bubbling (this activates the corn starch) and the topping golden brown.
  • Let sit for 15 minutes before serving so that it can cool and set a little. Don't worry, it will still be warm. You'll be tempted to serve it right away, but it will burn your mouth, trust me.
  • Serve with ice cream.
*I think it's best with stone fruit and berries, especially Italian plums with blackberries or nectarines with blueberries, but many different combinations would work.

Wednesday, September 1, 2010

Feijoada (Brazilian Style Black Beans with Orange)

This is another recipe that I used to worry someone who really knew how to make it would get mad at me for my non-traditional interpretation. Then I looked around on the internets and discovered that there is already a huge debate about what should be considered "traditional" Feijoada (it is considered by some to be the national dish of Brazil). I'd never even heard of it until one day I saw it upcoming on the menu at the Still Life and I was supposed to make it as a soup. This was before I could just Google it and find 50 different versions. I found it in one international cook book, one take on it as a side dish, and I invented a soup out of that (because almost anything can be reinterpreted as a soup). Now I'm back to serving it as side dish. The orange makes me think a little of the Caribbean. We eat it along side spiced, grilled meats, just as is with rice and tortillas, or as a soup with double the stock listed below.

Feijoada (Brazilian Style Black Beans with Orange)
serves 4, as a main dish with rice and tortillas

3 cups dried black beans, or 3 to 4 cans of beans
3 slices bacon, cut into small pieces (optional)
2 garlic cloves
4 cups stock
1 orange
2 limes
2 bay leaves
cayenne to taste
8 cloves
4 cardamon pods
1 cup chopped cilantro
3 cups kale, chopped (optional)
  • In the morning (or the night before if you're organized), rinse the beans and cover with cold water. In the evening, discard the soaking water
  • Cut the peel from the orange (save the peels), then slice out the pulp. See the directions below.
  • Saute the bacon in a stock pot until it just starts to brown. Add the garlic and saute until it starts to brown.
  • Add the beans along with the cayenne, orange peels, lime juice, bay leaves, and stock.
  • Tie the cloves and cardamon into a cheese cloth bundle, smack a few times with a heavy pot, and add to the pot.
  • Simmer for 2 hours (1 hour if using canned beans), adding water if needed. You'll need to stir more often near the end to keep it from sticking to the pot.
  • If you want to add the chopped kale (it makes for a heartier main dish), add it about 30 minutes from the end.
  • When the beans are tender, remove the cheese cloth bundle, stir in the orange juice and pulp, cilantro, and salt. Done.
To cut out the orange supremes:
  • Cut the very top and bottom off of the orange - just enough to see the pulp.
  • Start cutting from the top, "skinning" the orange until the pulp is showing. Don't worry about going entirely from top to bottom, you can just flip the orange and cut away any peel that you missed.
  • Holding the skinned orange in your hand over a bowl, slowly cut down both sides of the pith so that the supremes fall into the bowl with the juice. It's a little creepy to cut towards your hand, but if you go slow and don't apply too much pressure, you'll be fine.
(The photos function on Blogger is not working - again! - so I'll add photos of how to do this later. In the mean time, there are a bunch of decent video demonstrations online.) It's really not necessary to do a careful job for this dish because you're going to stir the pulp into the beans and break it all up anyway.

Tuesday, August 10, 2010

Mississippi Mud Bars

I don't know where this recipe originally came from, but it's one of the most "mom recipes" that I can think of (along with salad dressing, potato salad, and a few others). She used to cut these into star shapes and send them in our care packages to summer camp and college. I kept them hidden in the bottom of my closet when I was in New York for grad school. When I made these recently to take to a Clark family dinner, they went so fast I didn't have time to take a picture. It's a "boiled cake" which makes for a strange looking recipe if you haven't made one before. The frosting is very sweet so I recommend serving it in bite-sized squares or star shapes.

Mississippi Mud Bars
makes at least 24

Combine in a mixing bowl:
  • 2 cups flour
  • 2 cups sugar
  • 1/2 t salt
  • 1 t baking powder
Boil in a medium sauce pan:
  • 1 cup butter (2 sticks)
  • 3 T unsweetened cocoa
  • 1 cup water
Mix the chocolate mixture with the flour mixture and then mix in:
  • 2 eggs
  • 1/2 cup softened butter (1 stick)
  • 1 t vanilla
Pour everything into a jelly roll pan (a high-sided cookie sheet) that has been buttered and floured. Bake in a preheated 350 degree oven for about 20 minutes.

While the cake is baking, prepare the frosting. It needs to be spread on very quickly right when the bars come out of the oven, so be ready.

Boil:
  • 1/2 cup butter (1 stick)
  • dash of salt
  • 1 t vanilla
  • 2 T unsweetened cocoa
Add this gradually to 1 pound of powdered sugar that has been sifted. Then add 3 to 6 T of milk until the frosting is smooth.

Pour the frosting onto the hot cake and spread it with a butter knife as quick as you can. The frosting will start to set so it's best not to try to go back over it, just dump, smooth, and let it be.

Monday, August 9, 2010

Orzo Salad

 
This is a dish that is so simple, and so open to endless variations, that it seems a little silly to write it down as a recipe. But I've been working on orzo salads all summer and they are worthy of a post. You can change pretty much every part of this, but keep the orzo. There's something about its tiny, rice-like shape that makes for the best cold pasta salads. Try it with roasted vegetables off the grill, shrimp, an Italian vinaigrette, raw zucchini sliced very thin, chick peas and Moroccan flavors, just about anything.

Orzo Salad
serves 4 as a main dish

1 pound orzo
about a 1/3 cup olive oil (just enough to keep the orzo from sticking)
juice of 3 lemons
2 chicken breasts (optional)
2 tomatoes, seeded and cut small
1 cucumber, seeded and cut small
1/2 pound feta (I really like feta), crumbled
1 cup plain yogurt (Greek-style with fat works best)
1/2 cup mixed fresh herbs, minced (basil, mint, & oregano are my favorite)
1/2 a red onion, cut very very small
salt & pepper
  • Cook the orzo just like regular pasta, but pay attention to your colander. Mine has holes that the orzo fits through so I have to use a mesh strainer. 
  • Toss the orzo with the olive oil and half of the lemon juice. Set aside to cool while you prepare the rest.
  • Grill the chicken breasts with salt and pepper, cute into bit-sized pieces, and set aside to cool.
  • When the orzo and chicken are cool toss everything together in a large bowl. 
  • For best results, let it sit for at least an hour before serving. Sometimes I make it a few days ahead, but then I hold out the tomatoes and cucumber until I'm closer to serving it.

Saturday, July 17, 2010

Rigatoni with Roasted Zucchini and Crispy Prosciutto


Pardon me if this gets boring, but I'm madly in love with my vegetable garden. I stroll by it several times a day, shaking my tomatoes in hopes of getting them to set, noting the progress of the mess of Delicata Squash vines taking over the path, pinching off the bolted stems of the arugula so I can get one more spicy pizza out of it, standing at the potato barrel resisting the urge to dig down and see what's happening. It's about as organic as a city garden can be. We even splurged and put in a drip irrigation system so we haven't been wasting water. Here's the problem: I'm not much of a vegetable eater, but I planted all this to to challenge myself to figure out how to add more veggies to my diet. And it's working because I would make this again even if I didn't have a plant shooting out a zucchini a day.


Rigatoni with Roasted Zucchini and Crispy Prosciutto
serves 4

1 onion, thinly sliced
4 garlic cloves, thinly sliced
8 slices of Prosciutto, cut into thin strips (sub thinly sliced ham, if needed)
olive oil
4 smallish Zucchinis, or enough to really cover a cookie sheet, cut into coins
lots of grated Parmesan cheese
1 T chopped fresh oregano
1 pound Rigatoni
  • Start by crisping the Prosciutto in a pan that has been heated to medium-high and drizzled with a couple tablespoons of olive oil. Drop the strips into the oil and give them a stir so they don't stick. Cook until they're crisp - about 10 minutes - then remove to a plate.
  • Toss the zucchini coins in olive oil, salt, and pepper and lay them out on a cookie sheet. Roast in the oven at 450 for about 15 minutes or until they are nice and browned. If it's too hot outside to turn on your oven, just do them on the grill.
  • Cook the onion and garlic in the same pan as the Prosciuitto (adding more oil if needed). If you have a little extra time, it's nice to cook the garlic first separately, letting it get perfectly brown, and then set it aside with the Prosciutto. Then do the onion until nicely browned. If you're a little more rushed, cook the onion until it starts to brown on the edges, then add the garlic and do the same.
  • When the pasta is done, toss it with the onion, garlic, Prosciutto, oil from the pan, oregano, and a generous amount of grated Parmesan. Top with the zucchini coins. It's great warm or cold.

Tuesday, June 29, 2010

Easy Empanadas

 
When people complain about the weather here, I'm usually one of those annoying natives that says, "I like the rain." But Seattle's average temp so far this June has been 58, and that's just not OK. My plan has been to conjure Summer by cooking food that makes me think of warmer climates. Enter empanadas. They are so easy to make (don't ask me if this is authentic) and very adaptable to whatever is in season, whatever you're craving, or whatever happens to be in the back of the fridge about to go bad. The meat in this is highly optional. We're planning a batch with pizza toppings inside.

Empanadas
serves 2 for dinner, more as an appetizer

Dough:
2 cups all purpose Flour
1 t baking powder
1 t salt
1/2 stick butter (cut into small pieces)
1/2 c cold water

Filling:
1/2 a large yellow onion, diced
4 cloves of garlic, diced
1/2 pound beef (or maybe mushrooms or beans)
1/2 t ground cumin
1/2 t paprika
2 T fresh oregano
cayenne and salt to taste
1 T tomato paste
3 cups hearty greens (kale, chard, spinach), cut into bite-sized pieces.

First make the dough (or substitute frozen pie crust):
  • In a bowl, combine flour, baking powder, and salt. Using your fingers, cut in the butter until the mixture is crumbly. Add cold water and mix with a wooden spoon so the dough comes together.
  • Turn out dough onto a lightly floured work surface and knead  2 or 3 times to form a smooth ball. 
  • Flatten with the heel of your hand then roll out to a thin sheet (about 1/8 inch thick).
  • Cut into circles with a bowl or cup (depending on what size you want).
Then make the filling:
  • Saute the onions and garlic in a little olive oil. When they've just started to brown, add the meat (either ground beef or a steak cut into small pieces). Cook until the meat is just done (about 5 minutes).
  • Add the tomato paste and spices and cook until things start to stick. Then add the greens and all their moisture will make things unstick (or add a smidge of water if this doesn't work).
  • Cook the greens for about 5 minutes. You want the filling to be moist, but not too wet.
Now assemble the empanadas:
  • Put a little filling on half of each dough circle. I've learned (from many empanadas that wouldn't close) to start with half as much filling as I think it will take.
  • Dip your finger in a cup of water and use that to wet the edge of the dough. This will help it stick when you fold over and pinch or fork the edges closed. 
  • I haven't tried it yet, but I've heard that these freeze really well at this stage. You don't even need to thaw them, just take them out of the freezer and continue.
  • If you want, you can beat an egg and brush this on the tops of the sealed empanadas. Then bake at 400 for about 20 minutes, or until they are golden brown. Serve with hot sauce, chimichurri, homemade sour cream, or whatever you like.

Friday, June 18, 2010

Chimichurri

Chimichurri is sort of South American pesto. I don't remember how I discovered it - maybe a birthday of Mom's years ago when we went to the Buenos Aires Grill - but now I'm totally obsessed with it. I want to eat it not just on red meat, which is traditional, but on chicken and pork chops and salad and pasta salad and chips and sandwiches. It's acidic and spicy and freshy and I started eating it with a spoon last night and sort of made myself sick. But the point is, make this and I hope you'll love it too.

Chimichurri
makes about 1/2 a cup, which is plenty because this is very flavorful stuff

2 cloves garlic, peeled
2 cups (loosely packed) parsley
2 cups (loosely packed) cilantro
2 T fresh oregano (or 1 T dried)
1/2 t cumin
1/4 t red pepper flakes
1/2 t smoked paprika
juice of 1 lemon
1/4 cup red wine vinegar
1/4 cup olive oil
salt to taste

  • If you're pressed for time use a food processor to blend everything together (do the garlic first, then dump all the rest in), but it's a little more authentic if you just chop everything really small and mix it together in a bowl. Let it sit for about half an hour to get all the flavors together.
  • If you know that you don't like things that are very acidic, hold back on half of the lemon and vinegar and add them bit by bit to taste.

Tuesday, June 15, 2010

Whole Wheat Penne with Spinach Pesto and Chickpeas

This past weekend when I took a pair of garden shears to my spinach patch I thought, why did I plant this - I don't really like spinach. I prefer chard and beet greens and kale, all of which are exploding in the garden and I can't think of how to eat them all before they bolt. Then a friend suggested spinach pesto, which she makes exactly like basil pesto. Spinach pesto, even if it turned out as boring as I think spinach often is, would be garlicky and lemony and freshy. A pasta dinner started coming together in my mind. We were thinking we'd grill some chicken to add a little protein, but our budget for meat was busted (we're trying to only eat animal products from local, organic, ethical farms, but since we're on a serious budget around here that means we can't afford to eat as many as we used to). Inspired by my favorite ceci bruschetta topping, I added the chickpeas instead. It's a winner - fast, cheap, healthy, and super-flavorful.

Whole Wheat Penne with Spinach Pesto and Chickpeas
serves 3 to 4
printable

For the Pesto:
2 cloves of garlic, peeled
4 cups (loosely packed) spinach, washed and dried well
1 lemon
1/4 cup olive oil
1/2 cup parmesan, grated

For the pasta:
1 pound whole wheat penne, or other short pasta
1 clove garlic, minced
1 15oz can of chickpeas (a.k.a garbanzo beans)
1 sprig rosemary (optional)
extra parmesan for garnish

  • While the water for the pasta is heating, make the pesto (or substitute store-bought basil pesto) by first grinding the garlic with a little salt and pepper in a food processor. Then add the spinach and lemon and grind again. Add the cheese and drizzle in the oil a little at a time until it is the consistency you like.
  • In a small frying pan on medium heat, saute one garlic clove in a little olive oil until it just starts to brown.
  • Add the (drained) chickpeas and the rosemary sprig. Cook, stirring only a few times, until the chickpeas have browned a bit - about 10 minutes.
  • Toss the pasta with the pesto, chickpeas, and salt and pepper. Garnish with more parm. It's great warm or cold.

Tuesday, June 8, 2010

Orecchiette with Hearty Greens and Spicy Sausage

I didn't mean to have two posts in a row with the sausage/pasta/greens combination, but three things are at work here: 1) I love this combination 2) I have a small garden of mostly hearty greens and they are bursting out of their boxes, begging me to pick and eat them 3) I wasn't going to post this at all, but it turned into one of the best, fast dinners that we've made in a while. This is really just a variation on the Sausage Pasta that I've already posted, but see #3 above.

Orecchiette with Hearty Greens & Sausage
serves 4
printable version

1 regular onion, sliced
4 gloves of garlic, sliced
4 hot Italian sausages, casings removed (or a little less than a pound of bulk sausage)
4 cups (2 big handfuls) hearty greens like Kale or Chard, rinsed and cut into small pieces (sometimes you can find "braising mix" in the grocery store and that would be perfect)
1 pound Orecchiette, or other short pasta like Penne
plenty of grated Parmesan cheese
  • Put a pot of water on for the pasta.
  • In a large pan, saute the onions in a few tablespoons of olive oil (over medium heat, so they brown but don't burn), stirring often. When most of the edges are beginning to brown, add the garlic and saute that until it starts to brown.
  • Add the sausage to the onions and garlic, breaking it up into small pieces as it cooks. If the sausage is cooked through before the pasta is in the water, turn off the heat and set it aside.
  • When the pasta has about 5 minutes left to cook, add the greens to the pan (if you took it off the heat, turn it back on when the pasta goes in the water). Cook the greens while the pasta finishes.
  • Drain the pasta and toss it with the sausage mixture.
  • Serve sprinkled generously with salt, pepper, and grated Parm.

Friday, June 4, 2010

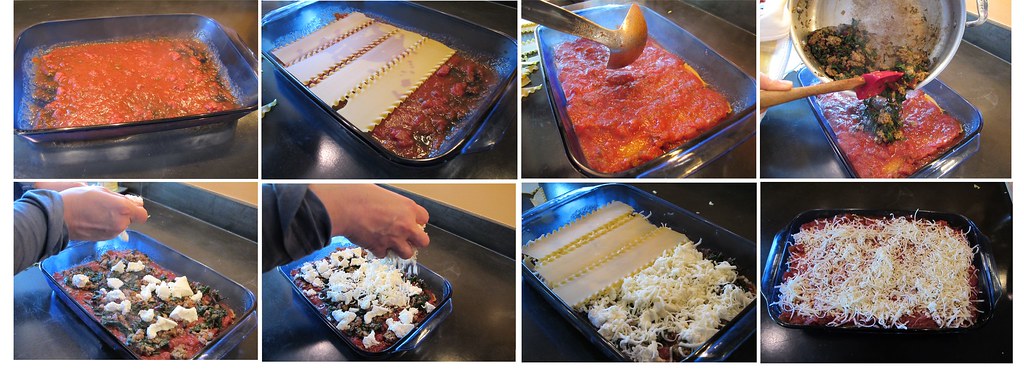
Simple (but so good) Chard and Sausage Lasagna

When I cooked at The Still Life in Fremont I had a love/hate relationship with lasagna as the lunch special. Love because it's easy (serve with salad, done) and endlessly adaptable to what's on hand or in season. Hate because half the time it turned out a little too wet and slippery and made for terrible presentation. Then I learned a trick: don't cook the noodles ahead of time, and I mean regular lasagna noodles, not the no-cook kind. When the noodles cook right in the dish with everything else, they soak up a lot of the liquid so a lasagna with vegetables doesn't turn into a sloppy mess. The recipe below includes sausage and chard, but you can use just about anything (pre-cooked) for the "flavor layer" - butternut squash, zucchini, chicken, ground beef, mushrooms, and on and on. We make a 9x13 pan for dinner and freeze the leftovers for emergencies, a.k.a. nights when we're too tired to cook.

Lasagna with Chard and Sausage
makes roughly 8 servings

6 cups cups tomato sauce (about 1 1/2 jars)
11/2 pounds mozzarella, grated
1 cup grated parmesan
1 15 oz container of ricotta
15 dried, regular lasagna noodles
1 onion, diced
4 cloves garlic, minced
1 large bunch of chard (or other hearty greens)
1 pound hot italian sausage, out of the casing

  • Preheat the oven to 375.
  • Saute the onion in a little olive oil until the edges start to brown. Add the garlic and saute until its edges are just starting to brown. 
  • Add the sausage and cook until done, breaking it up into small pieces as you go.
  • Cut the chard into thin strips and give it a rinse. Add this to the sausage and onions in the pan. Cook until wilted. This is your flavor layer.
  • Combine the parm and mozzarella and divide into three piles (the third one a little bigger than the other 2).
  • Heat up and doctor the sauce however you'd like. It's annoying that 1 jar of store-bought sauce is too little and 2 is too much. I use 1 jar, a can of tomatoes, about 1/2 a cup of red wine that's been reduced, and a bunch of herbs to make about 6 cups. 
  • Set aside 2 cups of sauce for the final layer. If you are running short in the middle layer your can skimp on sauce, but you can't skimp on the top layer or the trick of the uncooked noodles won't work.
  • Follow this order to layer the lasagna into a 9x13 pan: sauce, noodles set down the short way (break off the ends to make them fit), sauce, flavor layer, ricotta (don't bother spreading it, just drop it down in little lumps), cheese, noodles, sauce, flavor layer, ricotta, cheese, noodles.
 
  • For the top, use a generous amount of sauce and make sure that all of the top noodles are covered. Sprinkle with the remaining cheese. 
  • Bake covered for 45 minutes (do your best to tent the foil a little so it's not resting on the cheese), then remove the foil and bake until the top is browned - usually 15 minutes more. I put a sheet pan on the rack below to catch any drips of bubbling sauce.
  • Let it cool for 15 minutes before serving or it will goo all over and burn the roof of your mouth. I set the timer and make myself wait. Portion it out for leftovers the next day when it's cold.

Sunday, May 30, 2010

The List, week of May 31st


Possible new posts (if the recipes turn out just right): Lasagna, Beans and Rice, Paella.

Sunday, May 23, 2010

Carbonara


I love Carbonara. First of all, what's not to like? It's a simple pasta made of eggs, cured pork (guanciale, pancetta, or bacon), Parmesan or Romano cheese, and black pepper. Second, I have a double dose of nostalgia for this dish. When I was growing up one of my most favorite dinners was one Mom called Bacon Spaghetti. She laughed to hear that is was my favorite because it was something she made when she was feeling broke and the cupboards were a little lean. It wasn't until I went to Rome in college that I realized that Bacon Spaghetti was really Spaghetti alla Carbonara. As I continued to travel in Europe I had Carbonara almost every time I saw it on a menu. In Italy, it is often came as a swirl of creamy, salty, perfect spaghetti with a raw egg yolk floating in the center. The second it arrives at the table you stir in the yolk.
The night we made this we splurged and bought guanciale (cured pork jowl) from Sea Breeze Farms and, though not necessary, it made it extra good.

Pasta alla Carbonara
serves 4

1 poound spaghetti or bucatini
8 oz. cured pork (guanciale, pancetta, or bacon)
1 egg and 3 yolks
1 cup finely grated Parmesan or Romano cheese, plus extra for garnish
black pepper and/or red chili flakes
  • Put your pasta water on to boil. This dinner comes together very quickly.
  • Cut the bacon into cubes and cook in a pan until just starting to brown. Sprinkle generously with fresh cracked pepper and a pinch of red chili flakes. Continue to cook until the pork is light brown (about 2 or 3 minutes more).  If you're using pancetta or guanciale, add a little olive oil and be careful not to over-brown - they have less fat and are a little more sensitive to temperature than bacon
  • Remove the pan from the heat and let cool while you wait for the pasta.
  • When the pasta has about 5 minutes left, put the eggs, 1 cup of the cheese, and everything from the bacon pan, including the fat and the pepper, in a largish bowl. Using a fork, beat the heck of this mixture. It should be really well combined and maybe a little like a paste.
  • When the pasta is done, scoop out about a half cup of the pasta water, drain the pasta, and quickly add it to the bowl. Use your fork to mix everything together. Add a little pasta water bit by bit until the sauce is silky. Using very hot pasta and hot pasta water, is important so that the eggs are tempered.

Wednesday, May 19, 2010

Stacked Tomatillo Enchiladas

My favorite recipes are ones that end up feeling almost like formulas (for every one person you'd like to serve use 1 part this and 2 parts that) rather than the usual recipes we're all used to. This enchilada recipe is one of those easily adapted formulas that works with any type of protein from chicken to pork to a vegetarian substitute, just about any flavor/type of beans, any flavor of salsa, and a couple different kinds of cheese. It's an excellent way to use up leftover meat or even take advantage of the convenience of a ready-to-go rotisserie chicken. The "formula" below is for my favorite version - an imitation of the green enchiladas they used to serve at Barbacoa on Queen Anne (I miss their cocktails too, and the Mexican Hot Chocolate Flan).

Stacked Tomatillo Enchiladas
serves 2

6 small* corn tortillas
1 to 2 cups grated jack cheese (depending on how cheesy you like it!)
2 cups Tomatillo Salsa
2 cups Easy Pinto Beans
2 cups shredded chicken
garnish with sour cream and cilantro

  • Start with hot ingredients. Heat the salsa in a small pot and grill your chicken just before assembling (or heat up your leftovers), etc...
  • To heat up the tortillas, brush a sheet pan with oil and lay out the tortillas on it. Rub the tortillas in the oil, then flip so that both sides are coated. Heat them under a broiler until they are soft - just a minute or two on each side.
  • Build the enchiladas in 2 wide, shallow, oven-proof bowls or (if you're like me and you don't own anything like that) in any small oven-proof container that can go under the broiler. I've made boats out of aluminum foil in a pinch.
  • Start with a generous cup of beans in the bottom of each bowl, then top with a tortilla.
  • Sprinkle 1/2 a cup of chicken on top, drizzle with salsa, and top with cheese and another tortilla.
  • Do one more layer of chicken, salsa, cheese and tortilla. Then top the whole pile with a little more salsa and cheese.
  • Place under the broiler on high for about 5 minutes, or until the cheese has started to brown. Don't walk away - the last minutes under a broiler the cheese changes quickly.
  • Serve with sour cream and salsa. Watch out for the hot plate!
* I like more layers so I trim regular corn tortillas when I can't find the really small ones. If you're feeling like these are going to be too big, just do one layer!

Sunday, May 2, 2010

Clay Pot Chicken (Pot not required)

I remember a couple of food trends from when I was growing up. There was the year of the fondue party (in my memory it was instead of a normal Thanksgiving, but that can't be right); the everything-gets-sundried-tomatoes year; the Microwaved Food Revolution year; and there was the year everyone got a Romertopf Clay Pot for Christmas. Except in my family that last one stayed around for a while because of one dish in particular - Clay Pot Chicken. Mom also called it Beggar's Chicken, but I recently discovered that that would normally be a whole chicken covered in clay and roasted. What it has in common with that traditional Chinese dish is the simplicity. This is just marinated chicken served with rice and vegetables, but that marinade - I love it so much I always sneak some spoonfuls before dinner. It's a perfect combination of soy sauce and sherry and sesame oil and spices. I wasn't thinking I'd ever post this recipe, but now I know that you don't even need the clay pot. John prefers the chicken grilled and I'm slowly coming around to agree with him. You can also just skip the chicken and cook the sauce down for a different sort of "teriyaki" sauce to use on everything.


Clay Pot Chicken (pot not required)
serves 4

Marinade:
1 c low sodium soy sauce
1/4 c sherry (in the stores near us you can find this with the vinegar and cooking wine, but don't get sherry vinegar)
1 T sesame oil
1 t Chinese 5 Spice (or substitute a pinch of anise, cloves, cinnamon, and fennel)
1 t white pepper
1 t ground ginger
1 T minced garlic

1 pound chicken - we use boneless thighs, but anything will work
1 t cornstarch
1 t cold water
rice and vegetables of your choice
  • Combine all the ingredients for the marinade together in a ziplock bag or bowl and whisk well to incorporate the powdered spices. 
  • Add the chicken and mix it around so that it is coated in the marinade.
  • Let it sit for at least 30 minutes, but not all day or the chicken may become a little too salty.
  • Meanwhile, start your rice and prep your veggies.
  • Remove the chicken from the marinade, reserving the marinade, and grill it however you'd like.
  • While the chicken is cooking, put the marinade in a small sauce pan on medium heat. Bring it to a boil for about 3 to 5 minutes to be sure you've killed any bacteria that may be in there from the raw chicken. If this feels too sketchy (but I promise we do this every time and we don't get sick), make a double batch of the marinade and save half for the sauce. If it seems to have cooked down too much in this step, add a little water.
Optional: Mix the cornstarch and water together in a tiny bowl. Remove from the sauce from the heat and whisk in the cornstarch slurry. Put the sauce back on the heat at low and just let it bubble for a minute or two to activate the cornstarch, stirring often.
  • You can simply steam the veggies in a pan or microwave, but we like to cook them in a little canola oil in a wide, hot frying pan.
  • When the chicken is done, cut it into strips and toss it with the vegetables and a tablespoon or two of sauce.
  • Serve it with rice and more sauce, then add a little more sauce to the sauce - get it?


Tuesday, April 13, 2010

Roasted Tomato Pasta (sort of Amatriciana Sauce)


This is a perfect pasta for late Summer or for when some hothouse in B.C. is cranking out so many tomatoes that they're on super sale at the grocery store. Once they're roasted the tomatoes freeze well and are great to use on pizza, in dip, on a sandwich - so many things. This is basically an Amatriciana sauce - tomatoes, red chili flakes, and bacon or pancetta - though it would usually be served on spaghetti or bucatini (my new favorite). If you have the tomatoes on hand it only takes about 15 minutes to make. It's a great go to dinner - rich, spicy, simple, satisfying, and fresh.

Oops, too good to wait for the photo.
Roast Tomato Pasta
serves 4

5 pounds (about 15) ripe tomatoes
olive oil
salt & pepper
8 garlic cloves (papery skin still on)
4 slices of good bacon or equivalent of pancetta
2 generous pinches of red chili flakes
1/2 an onion, sliced
1 lb pasta
Parmesan cheese


  • Cut the tomatoes into eighths and spread them onto two sheet pans with the garlic cloves. I use a non-stick liner to make clean-up easier, but tin foil or parchment paper will work also. Drizzle with olive oil, sprinkle with salt & pepper, and then toss to coat.
  • Roast in the oven at 325 degrees for about 2 hours - until they are dark, but not burned. I know that's a long time, but you can make these on the weekend, store them in the fridge for a couple of weeks or freezer for a couple of months, and you'll have the toms ready for whenever you want them.
  • Scrape the tomatoes and any good pan juices into a bowl. Peel the garlic, mush it with the back of a spoon, and mix it in with the tomatoes.
  • Put on your pasta water. I set a half cup measuring cup next to the pot to remind me to take out some of the pasta water before draining. This is the only way I ever remember to do it.
  • In a frying pan, cook the bacon until brown but not hard.
  • Add the onion and cook until it starts to brown, then add the chili flakes and cook for about 2 minutes more. Set aside.
  • Cook the pasta and before draining take out about half a cup of the salty, gluteny water. 
  • Add the pasta to the bacon and stir in the tomatoes. Stir in the pasta water a bit at a time. If you forget this step, don't worry about it, it just smooths the sauce a little and helps it coat the pasta better.

Monday, April 12, 2010

Fresh Tomatillo Salsa

This is the 3rd or 4th time I've tried to make my own Tomatillo Salsa, but it's my first success. I use this salsa in Stacked Chicken Enchiladas, Green Chile Pork Tacos, and just for eating with chips so it seemed worthy of its own post. Thanks to a great blog that I just discovered, Mexican Foodie, for giving me the initial recipe that I varied a little.
I updated this post when I made a huge batch to give away. Scroll down to the bottom for those instructions.


Tomatillo Salsa
makes 2 to 3 cups, depending on how juicy the tomatillos are

1 pound fresh tomatillos
1 jalapeno
1 serrano chile
1/2 a red onion
2 T oil (not olive)
2 garlic cloves
1 cup cilantro
salt
1 to 2 limes
  • Heat a heavy-bottomed (preferably cast iron) pan to medium-high. Place the jalapeno and serrano chile in the dry pan and roast until they have are mostly black. You'll have to turn them a few times over 5 to 10 minutes.

  • Remove the chiles and place the tomatillos, husks removed, in the same pan. Blacken top and bottom and, if possible, a little of the sides. Set them aside with the chiles.

  • Roughly chop the onion and and it to the pan. It will cook quickly because the pan is so hot from the roasting. After about a minute add the oil, stir well, and remove from the heat.

  • Remove the seeds from the chiles and put them in a food processor with the garlic, cilantro, juice of 1 lime, tomatillos, and onions. Add salt to taste and blend well.

  • Adjust the seasonings, adding more lime, salt, and maybe even another chile. 
For a big batch, all the ingredients are the same, but I had to simplify the process or I would have been turning tomatillos in the pot all day.
  • Pre-heat the oven to 425.
  • Spread the tomatillos, onions, garlic, and serranos onto sheet pans that you've covered in foil (or else cleanup is a nightmare). Keep the different items as separate as you can because they roast at different speeds.
  • Roast in the oven until the edges of everything are blackened and at least a couple of the tomatillos have split. I pulled out the garlic first, then the onions, then serranos, and last the tomatillos.
  • Blend in batches according to the directions above. Combine all the batches together in a big bowl and check the seasonings.
  • Tomatillos, especially with lime added, are acidic enough to preserve just like you would do jam.

      Sunday, April 4, 2010

      Lentil Caviar with Cod and a simple salad

      I don't usually post a whole meal, but these three simple elements - lentil "caviar," cod cooked in butter, and and the simplest arugula salad - worked so well together that I have to suggest making the combination. I set out just to post the lentils which are great as a hot side dish or as the base for a lentil salad. We buy the tiniest green-black lentils we can find, but simple french lentils or small green lentils should work as well. To turn this into a salad just allow it to cool and then drizzle on a little olive oil and balsamic vinegar. Toss to coat and you're finished (unless you feel like adding some minced carrots and tomatoes and maybe a little feta, but then it doesn't look as much like caviar).

      Lentil Caviar
      serves 2 to 4

      1/2 yellow onion, diced small
      2 garlic cloves, diced small
      1 carrot, peeled & diced small
      1 1/2 cups tiny black lentils
      3 cups stock
      1 bay leaf
      2 t thyme
      1 t mustard
      fresh ground black pepper to taste
      • In a small pot, saute the onion and garlic in a tablespoon of butter or oil for about 5 minutes.
      • Rinse the lentils and add them to the onions along with the rest of the ingredients.
      • Simmer uncovered on medium (don't let it boil too hard or the lentils will turn to mush) for about 30 minutes. If the lentils are cooked, but soupy just ladle off some of the water. If the liquid cooks away before the lentils are done, add a little water.
      Simple Cod in Butter
      serves 2
      • Cut 3/4 to 1 pound Cod (depending on how hungry you are) into 4 portions. 
      • Heat 2 T butter in large skillet. 
      • Salt and pepper both sides of the fish. 
      • Pan cook the fish on medium heat until the fish starts to flake apart, about 10 minutes (flipping half way through cooking).

      Thursday, April 1, 2010

      Green Chile Pork Tacos with Homemade Sour Cream

      My favorite thing to make in my slow cooker is a spicy, tomatoey pork taco filling. I used to say it was the only thing worth making in a slow cooker, but now I know about a few other things. Lately, I've been trying to make my own tomatillo salsa for Stacked Tomatillo Enchiladas (success finally!), but since I still can't quite get that right I keep ending up with tupperwares full of decent, but not fantastic tomatillo salsa. What to do, what to do... Last week I adjusted my old, favorite taco recipe to be green instead of red and we were shocked to discover that we like it better. Shocked! How could our most loved dinner be changed and improved? Our world is rocked over here.
      Oh, and, we served it with homemade sour cream. Maybe that's why these were some of the best tacos I've ever made...


      Green Chile Pork Tacos
      serves 4 to 6

      1 yellow onion, diced
      4 cloves garlic, diced
      3 pounds boneless pork (just about anything will work, but you might need to trim off fat depending on which cut you use)
      2 cups chicken stock (depending on your slow cooker)
      2 T cumin
      2 T oregano
      2 cups tomatillo salsa (store-bought or try this recipe)
      1 bunch cilantro
      1 to 2 T pickled jalapenos, minced (they're spicy)
      1 7 oz can green chiles, or equivalent fresh chiles roasted and diced
      2 limes
      avocado
      corn tortillas
      sour cream

      • Sprinkle the meat with salt and pepper. Heat a little oil in a large frying pan and brown it on all sides - you're not cooking it now, just creating flavor. Put the meat in the slow cooker and put the lid on.
      • In the same pan, saute the onion until the edges start to brown, scraping up any good bits the pork left behind. Then add the garlic and saute just until it starts to brown.
      • Sprinkle the onions and garlic with the cumin. Have your stock ready. Toast the cumin until it starts to stick, then, quick, dump in your stock.
      • Add the rest of the ingredients BUT reserve 1 lime and some cilantro for the end. Bring this all to a bubble (I never put anything cold in my slow cooker) scraping the bottom to get all the toasted goodness off.
      • Pour this over the meat in the cooker and give it a bit of a stir so that the meat is coated. Scrape down the inside of the cooker so that no sauce is splashed above the line of sauce/meat (this helps with clean-up and prevents burned edges).
      • Cook on High for 6 to 8 hours. I check mine after 6 hours to see if it's too soupy. If it is, I cook it the last 2 hours with the lid off. Slow cooker vary a lot so you might need to stop after 6 hours or add a little more stock and keep going. The meat should me falling apart.
      • Add the juice of the second lime, break up the meat a little, and stir it in with the sauce. Serve it however you like tacos or with rice and beans. 
      Related Posts with Thumbnails