Pages

Tuesday, June 29, 2010

Easy Empanadas

 
When people complain about the weather here, I'm usually one of those annoying natives that says, "I like the rain." But Seattle's average temp so far this June has been 58, and that's just not OK. My plan has been to conjure Summer by cooking food that makes me think of warmer climates. Enter empanadas. They are so easy to make (don't ask me if this is authentic) and very adaptable to whatever is in season, whatever you're craving, or whatever happens to be in the back of the fridge about to go bad. The meat in this is highly optional. We're planning a batch with pizza toppings inside.

Empanadas
serves 2 for dinner, more as an appetizer

Dough:
2 cups all purpose Flour
1 t baking powder
1 t salt
1/2 stick butter (cut into small pieces)
1/2 c cold water

Filling:
1/2 a large yellow onion, diced
4 cloves of garlic, diced
1/2 pound beef (or maybe mushrooms or beans)
1/2 t ground cumin
1/2 t paprika
2 T fresh oregano
cayenne and salt to taste
1 T tomato paste
3 cups hearty greens (kale, chard, spinach), cut into bite-sized pieces.

First make the dough (or substitute frozen pie crust):
  • In a bowl, combine flour, baking powder, and salt. Using your fingers, cut in the butter until the mixture is crumbly. Add cold water and mix with a wooden spoon so the dough comes together.
  • Turn out dough onto a lightly floured work surface and knead  2 or 3 times to form a smooth ball. 
  • Flatten with the heel of your hand then roll out to a thin sheet (about 1/8 inch thick).
  • Cut into circles with a bowl or cup (depending on what size you want).
Then make the filling:
  • Saute the onions and garlic in a little olive oil. When they've just started to brown, add the meat (either ground beef or a steak cut into small pieces). Cook until the meat is just done (about 5 minutes).
  • Add the tomato paste and spices and cook until things start to stick. Then add the greens and all their moisture will make things unstick (or add a smidge of water if this doesn't work).
  • Cook the greens for about 5 minutes. You want the filling to be moist, but not too wet.
Now assemble the empanadas:
  • Put a little filling on half of each dough circle. I've learned (from many empanadas that wouldn't close) to start with half as much filling as I think it will take.
  • Dip your finger in a cup of water and use that to wet the edge of the dough. This will help it stick when you fold over and pinch or fork the edges closed. 
  • I haven't tried it yet, but I've heard that these freeze really well at this stage. You don't even need to thaw them, just take them out of the freezer and continue.
  • If you want, you can beat an egg and brush this on the tops of the sealed empanadas. Then bake at 400 for about 20 minutes, or until they are golden brown. Serve with hot sauce, chimichurri, homemade sour cream, or whatever you like.

Friday, June 18, 2010

Chimichurri

Chimichurri is sort of South American pesto. I don't remember how I discovered it - maybe a birthday of Mom's years ago when we went to the Buenos Aires Grill - but now I'm totally obsessed with it. I want to eat it not just on red meat, which is traditional, but on chicken and pork chops and salad and pasta salad and chips and sandwiches. It's acidic and spicy and freshy and I started eating it with a spoon last night and sort of made myself sick. But the point is, make this and I hope you'll love it too.

Chimichurri
makes about 1/2 a cup, which is plenty because this is very flavorful stuff

2 cloves garlic, peeled
2 cups (loosely packed) parsley
2 cups (loosely packed) cilantro
2 T fresh oregano (or 1 T dried)
1/2 t cumin
1/4 t red pepper flakes
1/2 t smoked paprika
juice of 1 lemon
1/4 cup red wine vinegar
1/4 cup olive oil
salt to taste

  • If you're pressed for time use a food processor to blend everything together (do the garlic first, then dump all the rest in), but it's a little more authentic if you just chop everything really small and mix it together in a bowl. Let it sit for about half an hour to get all the flavors together.
  • If you know that you don't like things that are very acidic, hold back on half of the lemon and vinegar and add them bit by bit to taste.

Tuesday, June 15, 2010

Whole Wheat Penne with Spinach Pesto and Chickpeas

This past weekend when I took a pair of garden shears to my spinach patch I thought, why did I plant this - I don't really like spinach. I prefer chard and beet greens and kale, all of which are exploding in the garden and I can't think of how to eat them all before they bolt. Then a friend suggested spinach pesto, which she makes exactly like basil pesto. Spinach pesto, even if it turned out as boring as I think spinach often is, would be garlicky and lemony and freshy. A pasta dinner started coming together in my mind. We were thinking we'd grill some chicken to add a little protein, but our budget for meat was busted (we're trying to only eat animal products from local, organic, ethical farms, but since we're on a serious budget around here that means we can't afford to eat as many as we used to). Inspired by my favorite ceci bruschetta topping, I added the chickpeas instead. It's a winner - fast, cheap, healthy, and super-flavorful.

Whole Wheat Penne with Spinach Pesto and Chickpeas
serves 3 to 4
printable

For the Pesto:
2 cloves of garlic, peeled
4 cups (loosely packed) spinach, washed and dried well
1 lemon
1/4 cup olive oil
1/2 cup parmesan, grated

For the pasta:
1 pound whole wheat penne, or other short pasta
1 clove garlic, minced
1 15oz can of chickpeas (a.k.a garbanzo beans)
1 sprig rosemary (optional)
extra parmesan for garnish

  • While the water for the pasta is heating, make the pesto (or substitute store-bought basil pesto) by first grinding the garlic with a little salt and pepper in a food processor. Then add the spinach and lemon and grind again. Add the cheese and drizzle in the oil a little at a time until it is the consistency you like.
  • In a small frying pan on medium heat, saute one garlic clove in a little olive oil until it just starts to brown.
  • Add the (drained) chickpeas and the rosemary sprig. Cook, stirring only a few times, until the chickpeas have browned a bit - about 10 minutes.
  • Toss the pasta with the pesto, chickpeas, and salt and pepper. Garnish with more parm. It's great warm or cold.

Tuesday, June 8, 2010

Orecchiette with Hearty Greens and Spicy Sausage

I didn't mean to have two posts in a row with the sausage/pasta/greens combination, but three things are at work here: 1) I love this combination 2) I have a small garden of mostly hearty greens and they are bursting out of their boxes, begging me to pick and eat them 3) I wasn't going to post this at all, but it turned into one of the best, fast dinners that we've made in a while. This is really just a variation on the Sausage Pasta that I've already posted, but see #3 above.

Orecchiette with Hearty Greens & Sausage
serves 4
printable version

1 regular onion, sliced
4 gloves of garlic, sliced
4 hot Italian sausages, casings removed (or a little less than a pound of bulk sausage)
4 cups (2 big handfuls) hearty greens like Kale or Chard, rinsed and cut into small pieces (sometimes you can find "braising mix" in the grocery store and that would be perfect)
1 pound Orecchiette, or other short pasta like Penne
plenty of grated Parmesan cheese
  • Put a pot of water on for the pasta.
  • In a large pan, saute the onions in a few tablespoons of olive oil (over medium heat, so they brown but don't burn), stirring often. When most of the edges are beginning to brown, add the garlic and saute that until it starts to brown.
  • Add the sausage to the onions and garlic, breaking it up into small pieces as it cooks. If the sausage is cooked through before the pasta is in the water, turn off the heat and set it aside.
  • When the pasta has about 5 minutes left to cook, add the greens to the pan (if you took it off the heat, turn it back on when the pasta goes in the water). Cook the greens while the pasta finishes.
  • Drain the pasta and toss it with the sausage mixture.
  • Serve sprinkled generously with salt, pepper, and grated Parm.

Friday, June 4, 2010

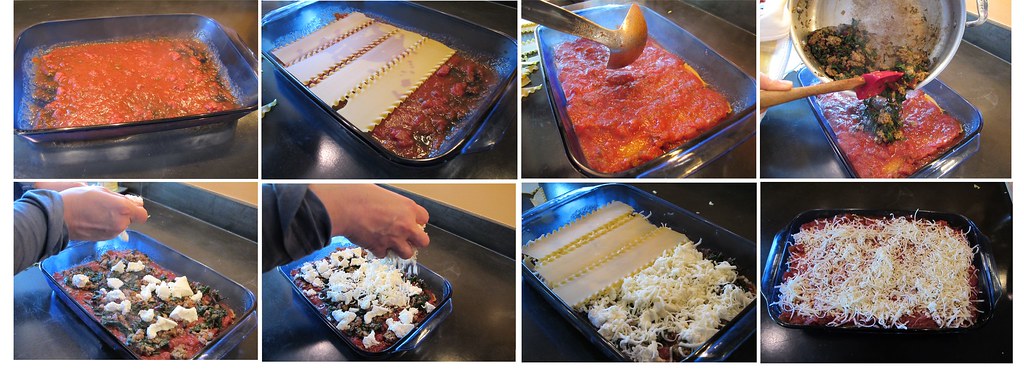
Simple (but so good) Chard and Sausage Lasagna

When I cooked at The Still Life in Fremont I had a love/hate relationship with lasagna as the lunch special. Love because it's easy (serve with salad, done) and endlessly adaptable to what's on hand or in season. Hate because half the time it turned out a little too wet and slippery and made for terrible presentation. Then I learned a trick: don't cook the noodles ahead of time, and I mean regular lasagna noodles, not the no-cook kind. When the noodles cook right in the dish with everything else, they soak up a lot of the liquid so a lasagna with vegetables doesn't turn into a sloppy mess. The recipe below includes sausage and chard, but you can use just about anything (pre-cooked) for the "flavor layer" - butternut squash, zucchini, chicken, ground beef, mushrooms, and on and on. We make a 9x13 pan for dinner and freeze the leftovers for emergencies, a.k.a. nights when we're too tired to cook.

Lasagna with Chard and Sausage
makes roughly 8 servings

6 cups cups tomato sauce (about 1 1/2 jars)
11/2 pounds mozzarella, grated
1 cup grated parmesan
1 15 oz container of ricotta
15 dried, regular lasagna noodles
1 onion, diced
4 cloves garlic, minced
1 large bunch of chard (or other hearty greens)
1 pound hot italian sausage, out of the casing

  • Preheat the oven to 375.
  • Saute the onion in a little olive oil until the edges start to brown. Add the garlic and saute until its edges are just starting to brown. 
  • Add the sausage and cook until done, breaking it up into small pieces as you go.
  • Cut the chard into thin strips and give it a rinse. Add this to the sausage and onions in the pan. Cook until wilted. This is your flavor layer.
  • Combine the parm and mozzarella and divide into three piles (the third one a little bigger than the other 2).
  • Heat up and doctor the sauce however you'd like. It's annoying that 1 jar of store-bought sauce is too little and 2 is too much. I use 1 jar, a can of tomatoes, about 1/2 a cup of red wine that's been reduced, and a bunch of herbs to make about 6 cups. 
  • Set aside 2 cups of sauce for the final layer. If you are running short in the middle layer your can skimp on sauce, but you can't skimp on the top layer or the trick of the uncooked noodles won't work.
  • Follow this order to layer the lasagna into a 9x13 pan: sauce, noodles set down the short way (break off the ends to make them fit), sauce, flavor layer, ricotta (don't bother spreading it, just drop it down in little lumps), cheese, noodles, sauce, flavor layer, ricotta, cheese, noodles.
 
  • For the top, use a generous amount of sauce and make sure that all of the top noodles are covered. Sprinkle with the remaining cheese. 
  • Bake covered for 45 minutes (do your best to tent the foil a little so it's not resting on the cheese), then remove the foil and bake until the top is browned - usually 15 minutes more. I put a sheet pan on the rack below to catch any drips of bubbling sauce.
  • Let it cool for 15 minutes before serving or it will goo all over and burn the roof of your mouth. I set the timer and make myself wait. Portion it out for leftovers the next day when it's cold.
Related Posts with Thumbnails